 |
|
Canadian Historic Sites: Occasional Papers in Archaeology and History No. 7
by Edward B. Jelks Queen's Battery AreaMost of the 1965 field season was spent excavating the Queen's Battery and its immediate environs. Two subareas were distinguished: (1) a lower level where the guns had been mounted; and (2) an upper level just to the north where magazines and other structures once stood.
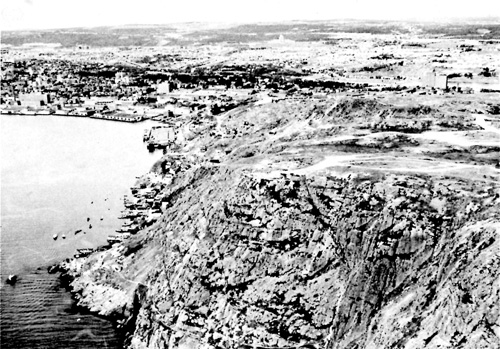
Lower Queen's Battery The battery proper was situated on a sort of shelf, some 160 ft. long by 40 ft. wide, overlooking the Narrows of St. John's harbour from atop a particularly precipitous section of cliff (Figs. 11, 12). This shelf, referred to here as the "lower Queen's Battery" area, was excavated by a crew under the supervision of Carole Yawney. A stone building foundation (structure 3) and three paved areas (structures 5, 6, and 7) were found there.
Along the shelf's outer edge was a low stone parapet behind which stood, in 1965, a battery of six cannon mounted on wooden bases. The cannon were not original, having been brought into the park from some unknown source—probably after 1900—and set up to portray, for the benefit of park visitors, how the battery might have looked early in the 19th century. Across the back of the lower Queen's Battery area, that is, along the inland edge of the shelf, the bedrock rose to form a narrow ridge running roughly east and west and parallel to the cliff at the seaward edge of the battery. The top of this ridge stood some 12 ft. above the level of the lower area of the battery, and its south flank, facing the gun emplacements, formed a steep scarp. The stone parapet along the outside of the shelf curved to meet the scarp at both ends of the lower Queen's Battery area. The face of the scarp had been scaled off to make it steeper along much of its western half and also at its extreme eastern end. Prior to excavation an earthen ramp angling up across the middle of the scarp provided a connecting roadway between the lower level of the battery and the upper level behind the scarp. East of the ramp where the scarp made a concave bend there was a stone retaining wall running along the chord of the bend, and the space between the wall and the scarp was filled with earth. The retaining wall, in effect, extended the approximately straight-line face formed by the western half of the scarp on across the eastern half. The retaining wall ran underneath the east side of the earthen ramp but did not emerge from the west side. From superficial appearances it looked as though the ramp was built at a later date than the retaining wall, and this was borne out by excavation. The lower area at the Queen's Battery was thoroughly explored. Virtually all of the cultural deposits lying on the shelf behind the parapet were excavated, and deposits banked against the exterior face of the parapet were tested. There was one major structure in the lower Queen's Battery; the stone foundation of a rectangular building designated as structure 3. Other structures, three patches of flagstone paving near the cannon, were labelled structures 5, 6, and 7 respectively. Stratigraphy Study of the deposits in the lower Queen's Battery area revealed that the flat shelf on which the battery had been installed was not a natural topographic feature but a purposely levelled surface. Originally the ground had sloped steeply from northwest to southeast, but it was levelled with stone rubble before the battery was emplaced. In addition to the rubble there were several other major depositional zones that proved of importance to archaeological interpretation of the area (Fig. 13).
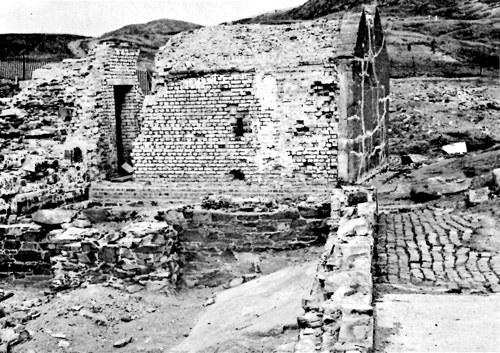
Zone A. Semisterile topsoil, averaging about a foot thick, extended over all of the lower area of the Queen's Battery. The upper part of this zone was a layer of turf that obviously had been laid down in relatively recent times, as it extended over the gravel fill of the trenches in which the traverse track foundations were set. According to Patrick Brophy, custodian of Signal Hill Park in 1965, the area was sodded during or shortly after World War II. Zone B. A thin charcoal-stained zone, nowhere more than an inch or two thick, appeared just beneath the topsoil over much of the lower Queen's Battery area. It contained little cultural material. Zone C. Semisterile brownish, sandy clay, generally between one and two feet thick, was distributed over the entire lower area of the Queen's Battery. This was apparently a layer of detritus that washed down from the upper area of the battery to the northwest. It contained a few bits of charcoal and an occasional tiny fragment of metal or a sherd from a broken dish, but these were probably washed in with the detritus. Zone D. A zone in the general vicinity of structure 3 with a high content of deteriorated mortar, up to 1.5 ft. thick, was rich in artifacts. Resting directly on top of the stone rubble with which the area was initially levelled, this zone consisted of trash that accumulated in and around structure 3, presumably during the time it was used as a barracks and perhaps for a short time afterward. Zone E. The rubble used for levelling, distributed over the southern and central portions of the lower battery area, reached a maximum thickness near 7 ft. and was semisterile. The rubble consisted of small, irregularly shaped stones from an inch or so to a foot or two in diameter with an occasional brick intermixed. Some of the stones had patches of mortar adhering to them, indicating that they had previously been part of a building at some undetermined place. Since the original ground surface had sloped downward to the southeast, the bed of rubble was thickest along the edge of the area near the parapet, and it pinched out against the higher ground on the north and west. Much of the foundation of structure 3, the paved spots near the cannon (structures 5, 6, and 7), and the stone parapet were all laid directly on the levelled surface of the rubble. The foundations for the traverse rails had been set in trenches that were dug into the rubble zone and refilled with small gravel. Zone F. Sterile deposits of glacial till rested on the irregular surface of the sandstone bedrock. The upper part, representing the surface of the ground prior to levelling, showed light humus staining produced by decayed vegetation. This zone actually included several different lenses of varicoloured soils, grouped here in a single zone for all of them are localized deposits of oxidized glacial till and, more importantly in an archaeological study, all of them predated human occupation of Signal Hill and were completely sterile of cultural material. As at the Interpretation Centre area, a fine-grained, grey clay coated the buried surface of the bedrock. Patently this was a subsurface accumulation formed by the redeposition of fine particles that were transported downward by percolating ground water. Some of the buried bedrock surfaces bore exceptionally well-preserved glacial polish and striations (Fig. 5). Structure 3 At the south end of the lower Queen's Battery area was found the stone foundation of a long, narrow, rectangular building (Figs. 12, 14, 16) of the proper dimensions to have been building 35 of the historical base map (Fig. 4), a wooden barracks erected prior to 1812. Approximately 55 ft. long by 13 ft. wide with its long axis running east-northeast and west-southwest, this building had been built against the previously described bedrock scarp marking the western boundary of the lower Queen's Battery shelf. The foundation consisted of undressed and crudely dressed stones of variable size mortared into narrow rows only a foot or so wide.
The south wall and adjacent parts of the east and west walls were laid on and in the upper part of zone E, the stone rubble with which the lower Queen's Battery area had been levelled. Because it was so crudely made, the foundation was difficult to discern among the rubble at times. It stood only one stone high in most places, but there were two and even three tiers remaining in others, especially in the eastern portion of the structure. The north wall must have been built directly against the vertical face of the bedrock scarp which had, in fact, been partially scaled off and dressed to make it straighter and more nearly vertical where it bordered on structure 3. The foundation was not sturdy enough to have supported masonry walls; therefore it appears certain that the walls of the building were of wood. A narrow cross wall marked off the building into two rooms, a large one 45 ft. long by 13 ft. wide at the east end and a smaller one (Fig. 15) measuring 10 ft. by 13 ft. running across the west end. At the north end of the smaller room was a brick hearth laid directly on the ground. A large rectangular chimney base (Fig. 17) near the centre of the large room was so placed as to suggest that its chimney was shared by two back-to-back fireplaces, presumably serving separate rooms. However, there was no evidence of a partition in the surviving foundation pattern.
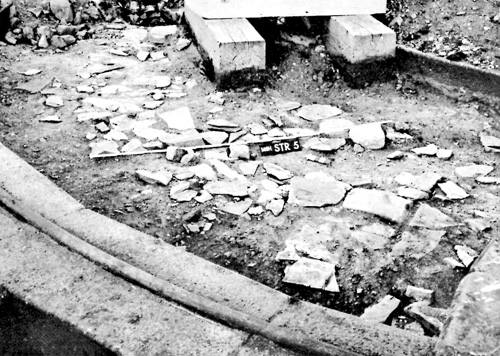
In and around the foundation of structure 3, especially in the eastern portion, were relatively heavy accumulations of trash in zone D, much of which appeared to have been discarded by the occupants of the barracks. These accumulations produced a large and varied sample of artifacts. Structures 5, 6, and 7 Structures 5. 6 and 7 were small floor areas paved with flagstones, or with flagstones and brick mixed together. The floors were laid on top of the stone rubble used to level the area and were buried beneath several inches of topsoil. The trenches in which the traverse track foundations were set had disrupted the floors, leaving only remnants of what originally may have been rather extensive expanses of paving. The purpose of these floors is not certain. Since they occupied the gun emplacement area, perhaps they were to provide solid footing for the men working the guns; or possibly some of them were floors of sentry boxes like the one that reportedly stood in the lower Queen's Battery area in 1805 (Ingram 1964: 28). Structure 6, especially, appeared to have been of the proper size and shape for a sentry box floor. Structure 5 (Figs. 16, 19) had been partially destroyed by a ditch in which the traverse track foundations for one of the cannon had been set. One edge of the pavement abutted the inside edge of the stone parapet, but it could not be determined with certainty whether the pavement was older or younger than the parapet.
The surviving portion of structure 5 occupied a curved area about 15ft. long and averaging perhaps 7 ft. or 8 ft. wide. The stones at the inner side were arranged in a squared up pattern. The original shape of the whole paved area is uncertain. Structure 6 was a square paved area about 7 ft. across with a short extension leading off the north corner (Figs. 16, 20). Paved with stones and bricks, it was built up against the stone parapet that borders the lower Queen's Battery. Most of the stones had been crudely squared to make them about the same size as the bricks. There had been some disruption of the pavement by two of the traverse track ditches. Traces of mortar indicated that the stones and bricks had formerly been mortared together.
Structure 7 (Figs. 16, 21) consisted of a roughly rectangular floor paved with flat, unshaped stones of varying sizes. Located near the northeast end of the lower Queen's Battery, it measured about 6 ft. long by 5 ft. wide, There were no traces of mortar between the stones. Although interrupted by traverse track ditches, the floor, when complete, was probably little larger than the portion that has survived.
Upper Queen's Battery The upper level of the Queen's Battery area lay above, and to the northwest of, the scarp that demarcated the border of the lower level (Fig. 10). The upper level consisted of a narrow bedrock ridge running along the top of the scarp, and behind the scarp to the northwest, an elongated, shallow depression averaging about 30 ft. wide paralleling the ridge. Another scarp, 10 ft. high on the average, bordered the elongated depression on its northwest. The entire area was explored thoroughly. Several masonry structures in various stages of ruin and disrepair were to be seen on the upper level before excavation began: (1) a one-room brick building with an intact, vaulted ceiling connected by a passageway to a one-room stone and brick building with its roof collapsed; (2) the ruins of a building comprising two large rooms, and (3) stone walls standing several feet high which connected the two-room and one-room buildings. Since this whole complex of rooms was joined together and the historical relationship of one room to another was not clear at the beginning of excavation, the entire series of connected rooms was labelled structure 2. Subsequently, excavation revealed that structure 2 consisted of several distinct components (magazines, barracks, and other structural elements of uncertain purpose), some of them built at different times than others. In several places there was unmistakable evidence of remodelling. One other major structure, a rectangular foundation of stone, was discovered in the course of excavating the upper Queen's Battery. It was designated structure 4. Minor structural remains found in the vicinity of structure 2 included remnants of several masonry walls and a subterranean drainage system made of bricks and stones. Stratigraphy In the upper Queen's Battery area, bedrock was exposed on the surface at the more elevated spots but was buried beneath deposits of glacial till, detritus, and topsoil in lower places. The geologic deposits were of no particular value for archaeological interpretation, being relatively thin and containing no undisturbed archaeological material. But within the component rooms of structure 2—and to a lesser extent around structure 4—the deposits often consisted of discrete strata containing cultural residue. These strata were excavated separately wherever it was practical to do so. The details of localized stratigraphy will be described below in the discussions of the respective structures and rooms. Structure 2 Structure 2 was the previously mentioned complex of rooms and walls at the upper level of the Queen's Battery, much of which stood above ground when excavation was begun in 1965. Buildings 52, 59, and possibly 80 of the historical base map were clearly present in the complex. Prior to excavation, structure 2 was divided into five components, labelled rooms A through E (Fig. 23), and each was dug as a unit. A house (partly frame and partly brick according to informants) was built over the ruins of rooms C, D, and E at some unknown but relatively recent time, probably in the 1920s.
Room A. The most complete early building on Signal Hill, room A was a brick magazine with a vaulted ceiling (Figs. 23, 26), evidently either building 36 or 52 of the historical base map (Fig. 4). A major portion of its brick roof was still in place in 1965; however, the entire building was levelled in the winter of 1965-66 as it was deemed a hazard to park visitors. Room B was razed at the same time.
Made of yellow brick laid in English bond, the magazine here designated room A was a sturdily built structure. Its walls, more than 2 ft. thick, were supported by a brick footing some 3 ft. wide which rested on a massive foundation of dressed and rough stone mortared together. The latter was seated on bedrock or, in some places, on compact glacial till. Room A was of rectangular shape, with its long axis running roughly north and south. The original floor was of wood. Baffle type ventilators had been built into the east, west, and south walls, and a narrow hall with an arched brick ceiling ran across the north end. The hall possibly served as a shifting room. A door at its east end opened to the outside, and entrance to the magazine proper was gained through a door in the south wall of the hall. The exterior surface of the south wall had been stabilized—rather obviously in recent years—by applying a coating of concrete. Inside dimensions of the main room were; length, 12.5 ft.; width, 8.25 ft.; maximum ceiling height above the original floor level, 9.5 ft. A subterranean drain made of brick ran around the exterior of the magazine against the outside of the wall's footing, a foot or so beneath the surface of the ground; it led off to the northwest, joined a stone drain coming down from room B and continued to the western border of the Queen's Battery area where it emptied down the hillside (Figs. 23, 27, 28, 29).
Room A had been remodelled at least once and probably twice. When room B (another magazine) was erected contiguous to room A on the north, a connecting doorway was cut through the north wall of the narrow hall. Two windows were cut into the east wall of the main room after it was no longer used for storing powder, and a door was installed at the west end of the hall. Two rows of bricks running across the room evidently had helped support a wooden floor during the later occupation of the room. A few artifacts were found in the soil inside room A, but no stratigraphic analysis was attempted as most of the artifacts appeared to be of very late 19th- and 20th-century age and of little or no value for distributional analysis. Room B. Another magazine, room B (Figs. 23, 29) was constructed of stone after room A was already standing. It consisted of a rectangular main room the same size as room A (12.5 ft. by 8.25 ft. inside dimensions) and a hall (Fig. 30) connecting it to room A. The long axes of both the room and the hall were aligned with that of room A (that is, running approximately north-south). The north wall of room A was incorporated into room B as its south wall, and a door was cut through its centre to provide entrance into the main room via the hall.
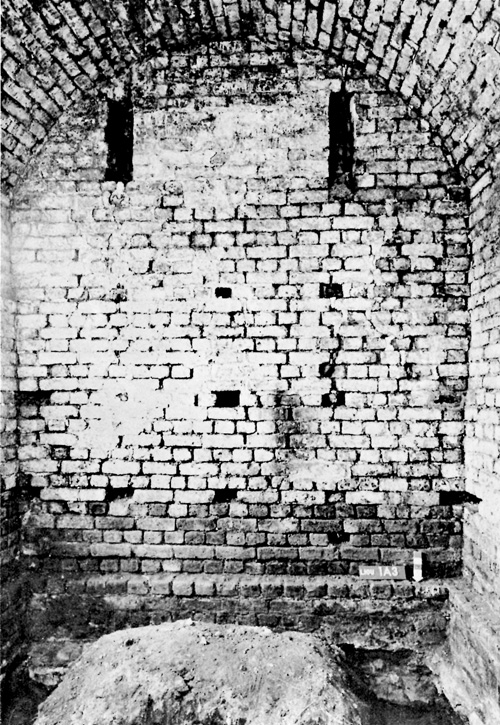
Judging from pieces of granite lying nearby, the exterior of this magazine above ground level was originally faced with slabs of granite, but if so the facing was subsequently removed. The walls were estimated to have been about 4 ft. thick when still intact, and, behind the facing, they were made up of rough, flat, irregular stones set in mortar. In 1965, the interior wall surfaces consisted of the flush edges of these flat stones (Fig. 31), but before the magazine fell into ruin they were probably surfaced with plaster.
There had been a vaulted ceiling like that of room A (except that it was made of stone), but it had collapsed along with the roof. Still in place was the ceiling of the hall at room B, consisting of long blocks of granite laid athwart the hall, their ends resting on the tops of the east and west walls (Figs. 30, 32). The hall was floored with flagstones; the main room originally had a wooden floor.
Two magazines (buildings 36 and 52) are shown in the upper Queen's Battery area on the historical base map (Fig. 4), but they are portrayed as being separate, not joined. Nevertheless, rooms A and B must be the magazines shown. Unfortunately there is no available information on the dates of construction or other historical details regarding them. The south half of room B was not excavated, but the north half was taken down to undisturbed soil. The accumulated deposits in the entrance hall were also removed down to the flagstone floor. Two distinct zones of fill were visible inside room B: (1) a thin layer of dark material containing a great deal of charcoal and some artifacts, resting on sterile subsoil and ranging in thickness from 1 in. to 4 in., and (2) a heavy accumulation of building stones and other debris extending from the charcoal layer to the surface, 4 to 5 ft. thick. The artifacts from the two strata were studied separately in the distributional analysis, the artifacts from the entrance hall being included with those from the upper stratum. Room C. The area between room A and Room D was designated room C (Fig. 23), although after excavation it became doubtful that there ever was an actual enclosed room there. The west wall of room A formed room C's eastern boundary and the east wall of room D its western boundary; a stone wall connecting the southwestern corner of room B with the northeastern corner of room D formed its northern boundary. There was no evidence of a wall on the south side of room C. Perhaps the room C area functioned primarily as a firebreak zone between the magazines on the east and what was evidently a barracks (rooms D and E) on the west. The wall marking the north boundary of room C was made of rather nicely squared stones of varying sizes (Fig. 33). Two feet wide and still standing several feet above ground in 1965, this wall was abutted squarely against, but was not bonded into, the southwest corner of room B. The north face of the wall was flush with the north face of room B's south wall. A corresponding stone wall extended eastward from the southeast corner of room B (see Fig. 23). The south wall of room B, it will be recalled, was originally the north exterior wall of the brick magazine (room A) before the stone magazine (room B) was built. The two stone walls which, in effect, extend that wall east and west were probably added before the stone magazine. Inside room C, against the stone wall at the north end of the room, were two stone and brick lined, rectangular pits that evidently were built as latrines but which ultimately were used for disposal of trash (Figs. 33, 34). Measuring 4ft. wide, 6 ft. or 7 ft. long, and 3 ft. or 4 ft. deep, these pits yielded more artifacts than any other part of the structure 2 complex, most of them seemingly dating from early to mid-19th century. A layer of soil containing a small quantity of occupational debris had accumulated over the bedrock and sterile glacial till which constituted the subcultural floor of the room C area outside the two latrine pits, but it produced no material of particular significance.
Careful inspection of the walls, foundations, drains, and other structural remains in and around room C led to the conclusion that the latrine pits and the room's north wall were contemporaneous and that both postdated the brick magazine (room A) and predated the stone magazine (room B) as well as the barracks (rooms D and E). For analysis of artifact distribution, the deposits within room C were divided into three areas: (1) the east latrine; (2) the west latrine, and (3) the floor area outside the latrines. The deposits in the floor area, only about 1 ft. in maximum thickness, were separated into two units, upper and lower. Artifacts from the more than three feet of deposits in the ash pits were plotted by the levels of excavation—three inches each in most instances. Rooms D and E. Contiguous to room C on the west lay the stone foundation and lower walls of a rectangular building, its long axis running roughly east and west (Figs. 23, 25). It was divided into two sections—designated rooms D and E respectively—by a jerry-built cross wall of brick. This clearly represents the remains of a substantial building which can confidently be identified as building 59 of the historical base map, a barracks built in 1831 (Ingram 1964:32). The exterior walls were 2 ft. thick. The exposed stones on their inner and outer faces were squared and neatly fitted together (Figs. 35-37); the core of the walls, however, was of mortared rubble. In 1965, the walls were standing to what appeared to be the level of the original wooden floor, which of course had disappeared long ago; in other words, these were the walls of the barracks basement. Bedrock at that particular spot sloped downward steeply to the north, and the footings of the south wall together with those of the southern portions of the east and west walls were set directly on bedrock (Fig. 35). The north wall and adjacent parts of the east and west walls, however, were footed on glacial till and stood considerably higher at floor level than the south wall because of the steep gradient of the ground.
A rectangular buttress at the northeast corner of the barracks was bonded into the foundation and therefore must have been built into the original building. Other structural features included a heavy stone chimney base set against the interior of the east wall (Fig. 36) and a small footing evidently for a wooden pier which has long since vanished—in the middle of room D. The brick cross wall, which was not bonded into the exterior wall foundation at either end, divided the barracks basement into two rooms, the larger one (room D) to the east measuring 21 ft. by 23 ft. on the inside, the other (room E), 21 ft. by 10 ft. The cross wall, 8 in. thick, was built partly of yellow bricks like those of room A and partly of red bricks that were slightly shorter than the yellow ones. The bonding was erratic. When excavation was begun, both rooms were filled with brick, stones, and other rubble from the collapsed building. It will be remembered that a house which had been built on the foundation of the original barracks was occupied until 1956, when it burned. A major part of the rubble appeared to have come from that house. In any case, modern (mostly 20th-century) rubble including the remains of household furnishings and other artifacts was found all the way down to bedrock or undisturbed glacial till over all of room D. In room E, however, there was a separate, earlier deposit underlying this rubble which contained artifacts of mid-19th century age almost exclusively. They undoubtedly accumulated as trash under the building during its use as a barracks. For distributional analysis the artifacts from room D were lumped together as a single sample, but those from room E were separated into two groups; an earlier one thought to correlate with the 19th-century barracks, and a later one believed to have derived from the 20th-century caretaker's house. The earlier sample from room E came from a stratum several inches thick which was covered over with several feet of debris that presumably derived from the burning and collapsing of the caretaker's house. Other Features of Structure 2. Besides the five rooms described above there were several components related to the structure 2 complex of buildings which are worthy of mention. Jutting off in an easterly direction from the southeast corner of room A was an area measuring approximately 12 ft. long by 6 ft. wide which was paved with bricks (Fig. 24). Evidently a sort of patio, this structure is believed to have dated from the caretaker era of the 20th century. Running along the outside of room D on the south side was a second brick-paved patio 6 ft. or 7 ft. wide (Fig. 25). It began at the east end of the room and extended for some 18 ft., about two-thirds of the room's length. This patio may have dated from the 19th century when the barracks was in use, but there was no way to be certain. Extending on to the west from the brick patio, along the south side of rooms D and E, was a poured concrete floor 12 ft. long by 6 ft. wide. This surely was of 20th-century provenience. The concrete floor, probably for a porch, appeared to have truncated the brick patio, which in its original state perhaps ran all the way across room D. A system of masonry conduits draining the two magazines was obviously intended to keep the powder storage areas dry (Figs. 23, 27-29, 39). Around the outside of the earlier magazine (room A) ran a brick drain which was built against the outer face of the stone foundation a foot or two underneath the ground. The floor of the drain consisted of a single row of bricks laid edge to edge; its side walls were formed by two courses of stretchers, a single brick wide, and the top consisted of a single row of edge-to-edge bricks like that of the floor. The resultant conduit had an opening that was about 6 in. square in cross-section. The drain for the stone magazine (room B) originated in a vertically placed iron grate that was set in the ground approximately 2 ft. outside the magazine's west wall, about equidistant from the two ends of the building. The grate opened into a conduit similar to the one described above except that the sides and top were made of flat stones instead of bricks. The floor was of bricks placed edge to edge like that of the other drain. The two drains converged some 20 ft. west of the magazines and continued as a single conduit (made like that of the stone magazine) on across the shelf of the upper Queen's Battery to empty down the steep hillside at the shelf's west edge. On the way it intercepted the southwest corner of structure 4, then bent sharply to the left, a route suggesting that the drain was designed to serve not only the two magazines but structure 4 as well. In room C, just below the surface of the ground, a short section of brick drain was exposed. It was V-shaped in cross-section and was not covered. A narrow floor was composed of a single row of bricks set end to end; each side, angling up from the floor at perhaps 30 degrees off the horizontal, was made up of a single row of bricks placed edge to edge. This drain was laid over the fill of the west latrine and clearly was of relatively recent, probably 20th-century, vintage. Structure 4 Structure 4 was represented by only two components: a brick hearth and a single course of dry-laid stones forming a straight, three-foot-wide footing some 16 ft. long (Figs. 23, 38, 39). The line of the footing ran approximately northeast and southwest, paralleling a bedrock scarp about 15 ft. to the northwest. The area between the footing and the scarp was filled with stone rubble. The brick hearth lay at the base of the scarp opposite the east end of the footing.
The face of the scarp had been straightened and dressed off to make it more vertical, in much the same manner as had the scarp in the lower Queen's Battery area against which the north wall of structure 3 was built. Structures 10 and 11 were built in a similar way; that is, with their north walls against sheered natural scarps. In view of the similarity of the structure 4 remains to the pattern established by structures 3, 10, 11, it appears likely that a wooden building occupied the structure 4 area at one time, its south wall standing on the stone footing and its north wall set right against the scarp. The hearth, in that case, would have served a chimney in the northeast part of the building. This is conjectural, however, as no wall foundations were present where the east and west ends of such a building would have been, nor was there any trace of a foundation along the base of the scarp where the north wall would have stood. Miscellaneous Features In addition to structures 2 and 4, additional structural features were unearthed at the upper Queen's Battery; a pit containing 20th-century trash (evidently the caretaker's privy), and two stone walls that met to form a right angle (Fig. 23). One of the walls, about 40 ft. long, ran alongside the north wall of the barracks (rooms D and E of structure 2). A space of four or five feet separating the wall from the barracks was filled with stone rubble. From the southwest end of that wall, at right angles, extended the second wall, 23 ft. long. The latter ran across the end of the shallow depression lying between structure 2 and the scarp at the northwest edge of the upper Queen's Battery. As the shallow depression drained naturally down a steep cliff at that end, the wall was probably designed to check loss of the scanty topsoil by erosion. Testimony of the Caretaker On July 16, 1965, Mr. Walter Boone, who claimed to have lived in the caretaker's house for 22 years, was interviewed by Mr. Woodall. The exact dates of Mr. Boone's residence were not ascertained, but he must have lived there between 1900 and the time the house burned, apparently in the middle 1950s. The following notes on Mr. Boone's testimony were made by Mr. Woodall.
History of the Queens' Battery Area Installation of the gun positions at the Queen's Battery was begun in 1796 and presumably was completed the same year (Richardson 1962: 6). Probably levelling of the lower Queen's Battery area was done at the same time. There seems to be no record of exactly when the 50 ft. by 13 ft. wooden barracks at the lower Queen's Battery (structure 3 of this report; building 35 of the historical base map) was built, but it is reported to have been standing in 1812 (Ingram 1964; 28). In 1831, it was torn down and replaced by a more substantial barracks at the upper Queen's Battery (structure 2, rooms D and E of this report, building 59 of the historical base map) (Ingram 1964; 8, 32). The brick magazine (structure 2, room A) and the stone magazine (structure 2, room B) cannot be individually correlated with documented structures. However, they are probably buildings 36 and 52 of Figure 4, even though Ingram (1964; 29, 31) states that both buildings were brick. There seems to be no contemporary reference to a stone magazine.
Dates for the paved areas at the lower Queen's Battery (structures 5, 6, and 7) are uncertain, but they predate the traverse tracks and consequently were probably installed before 1860.
No accurate estimate can be given of the date of structure 4, but it may well have predated the barracks built in 1831. |
|||||||||||||||||||||||||||||||||||||||||||||||||||||||||||||||||||||||||||||||||||||||||||||


|
||||||||