 |
|
Canadian Historic Sites: Occasional Papers in Archaeology and History No. 12
by Charles S. Lindsay Lime Preparation in FranceLimestone Limestone, when considered as a constituent of mortar, is classified on the basis of its ability to set under water. That which will set produces "hydraulic lime" and contains more than 10 per cent alumina and silica impurities. That which will not set, "non-hydraulic lime," contains less than 10 per cent of these elements. In general, non-hydraulic lime is obtained from chalkbeds and oolitic limestones, and hydraulic lime is obtained from argillaceous, siliceous, carboniferous and lias limestones. In the 18th century, however, limeburners, being generally uneducated in the chemical composition of their raw materials, classified limestone on the basis of its hardness. The darker and harder the stone, the better lime it produced when burnt. However, the softer beds of stone and the upper, less well-compacted beds were often used because they were easier and cheaper to quarry. To change the limestone into a form suitable for use in mortar it must first be burnt, which drives out the carbon dioxide (CaCO3 + heat = CaCO3 — CO2 = CaO). The result is quicklime, which is then slaked with water to form calcium hydroxide or hydrated lime (CaO + H2O = Ca[OH]2) which, when mixed with sand to make mortar, loses water through evaporation during setting (Ca[OH]2 — H2O = CaO) and absorbs carbon dioxide from the atmosphere (CaO + CO2 = CaCO3) where by the cycle is completed and the finished product returns to limestone.1
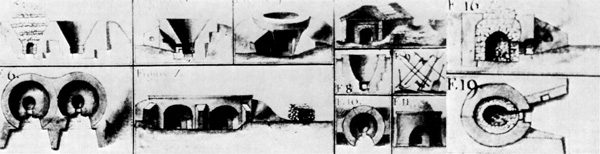
Lime-kilns Lime-kilns, where the quarried stone was taken to be burnt to form quicklime, were a common feature of the landscape in the 18th century, both in limestone regions and in areas where building was taking place. Such a ubiquitous type of structure inevitably manifested itself in many forms, the variations being the product of regional styles, different methods of operation, the relative longevity intended for the kiln and the varying skills and knowledge of the builder. A few sources of detailed information on the subject of lime-kilns and their operation have survived from the 18th century. The most comprehensive is a work entitled L'Art du chaufournier written by Fourcroy de Ramecourt in 1766. This work deals in detail with the design, operation and economics of lime-kilns, mainly along the northeastern and eastern borders of France. The illustrations are plentiful, detailed and well described. Diderot's Encyclopédie contains an article on a "flare" kiln in volume 3, published in 1753, which was copied verbatim by de Ramecourt with the comment that he had never seen such a kiln and that it was probably an idealised version of a type that existed in the Ardennes. In 1766, Diderot returned the compliment by copying a section on a "running" kiln from de Ramecourt and publishing it verbatim in the second volume of the supplement to the Encyclopédie. A third source of information is an illustration of several types of lime-kilns attached to a treatise on military construction written by the French engineer, Masse, and found in the archives of the Corps of Engineers.2 This treatise, published in 1728, has little to say about lime-kilns, but the illustrations are useful since they purport to be of actual examples of lime-kilns existing in various regions of France.
A later source of information is Traité sur l'art de faire de bons mortiers by Raucourt de Charleville. Although this work was not published until 1828 and therefore contains some elements of design and operation that were not known in the 18th century, it is very useful for the detailed descriptions of the operation of kilns and the selection of fuels. The anonymously authored Architecture rurale published in 1820 also has a few useful comments on the subject of lime-kilns. Although there were numerous variations in design of kilns, they were grouped in two types by most writers. The first type, known as grande flamme or "flare" kilns, had a fire set on the floor beneath an arch or dome supporting the load of limestone. The heat from the fire penetrated between the stones to calcine them, without any direct contact between fire and stone. When the load was burnt the kiln had to be cooled before the lime could be removed. The second type of kiln, petit feu or "running" kiln (equivalent to a draw-kiln), was loaded with alternating layers of limestone and fuel and had openings around the base to draw off the burnt lime. The fire was set at the bottom and gradually worked its way up through the load. As the lower layers were calcined, they were drawn off at the bottom and the upper layers sank lower into the kiln. The gap at the top was filled with fresh layers of stone and fuel, thus creating a continuously operating kiln. This type of kiln had the obvious advantages of mass production, but also some of its disadvantages, since the intimate contact of fuel and stone produced a dirty quicklime compared with the product of a flare kiln. The location of a kiln depended on the relative cost of three elements; transport of limestone transport of quicklime and transport of fuel. Because of this interdependency, kilns were to be found either at the limestone quarry, near the building site, or occasionally near a coal or wood source. According to de Ramecourt, the kilns of the Rhône valley were situated at the spot most convenient to the quarry, whether or not the best lime had already been removed.3 On the other hand, the limeburners of Provence were semi-nomadic, setting up their kilns wherever there was an immediate market and carrying their fuel with them due to the scarcity of wood in that part of France. One effect of this nomadism was that the limeburners, who often quarried their own stone, used only the upper beds which were soft and easily calcined. Unfortunately, these limestones expanded much less than most when slaked; as a countermeasure a law was passed in Provence compelling the limeburners to sell their lime already slaked.
Flare Kilns The simplest form of flare kiln was described briefly by Diderot.
The obvious cheapness of such a kiln was its main attraction to individuals who required perhaps only a single batch of lime. However, the saving in construction costs was partly offset by the lack of control in the operation of such a kiln and the likelihood, therefore, that much of the limestone would emerge uncalcined. The more sophisticated flare kilns were often subterranean except for the top of the wall. Such kilns were often built into the side of a hill (Fig. 3, c) or reinforced with banks of earth. Sometimes free-standing kilns were built, but the expense of constructing very thick walls was prohibitive. Most flare kilns were circular with a cylindrical interior, though some tapered slightly toward the base (Fig. 3, b). In the late 18th, and 19th centuries, the interior form of these kilns was gradually modified to an egg-shape truncated at top and bottom (Fig. 2). Bottle-shaped kilns with constricted openings at the top were also known in the 18th century, one being illustrated by Diderot.5 These shapes resulted in less heat loss at the top. The walls of these kilns were usually one or two pieds thick. The author of Architecture rurale stated that the thickness of the walls should be one-fifth the diameter of the kiln.6 Other writers contented themselves with noting that the walls should be strong enough to withstand the heat of the fire. Diderot's idealized kiln had a base 12 pieds square, and an oval kiln above, 9 pieds in diameter at the widest point inside. De Charleville noted that the bigger the kiln, the more expensive and difficult it was to construct. The internal diameters of de Ramecourt's kilns ranged from 6 pieds to 15 pieds, though he recommended that smaller ones be built. The Masse illustration (Fig. 1, 16) showed a flare kiln 11 pieds in diameter, but the accompanying text explained that these drawings were of kilns in use by the general populace while those used in the king's works were bigger and often found in groups of two, three, four or six.7 The best material for building kilns was brick, but this was expensive and most kilns were constructed of whatever stone was available. The most durable stones were granite and flint, but other hard stones such as sandstone were adequate. De Ramecourt recommended that mortar should not be used in those parts of the kiln exposed to the heat of the fire,8 but rather clay mixed with water (puddled clay). De Ramecourt also noted that in Provence, kilns were lined inside with well-beaten clay to protect the masonry.9 Others were lined with brick. In Diderot's idealized kiln there was a stone-lined channel running beneath the floor of the kiln to supply air to the fire through holes in its arch (Fig. 2). Diderot called this an ébrasoir, De Ramecourt recommended that more kilns should have such a flue, but by 1820 when Architecture rurale was published, it was noted that all the simpler kilns still lacked this feature.10 The Masse illustrations, drawn in 1728, do not show this flue on any kiln, so one may assume that its introduction came later and its widespread adoption did not occur until the 19th century. The flare kiln was loaded so as to leave a gap at the bottom for the fire. In Provence this was done by selecting flat stones for the construction of a corbelled dome (Fig. 3, a). In Champagne, large stones were selected and placed radially on a dome-shaped mass of fagots supported on stilts (Fig. 3, d). Once the fire was started, the stilts would burn away, but by that time the weight of the limestone had stabilized the arch. With the dome in place, the remainder of the kiln could be loaded. Usually the larger pieces were placed near the centre and the smaller ones near the edge. This distribution achieved two purposes. First, the larger stones, being nearer the fire, were more easily calcined through to their cores, and second, since this arrangement tended to leave larger gaps between stones, the heat circulated more easily through the kiln. In some kilns the heat was further distributed by means of vertical chimneys which consisted of wooden logs set upright in the mass of stones (Fig. 3, d). These quickly burnt out and created flues to draw the heat to the top of the kiln. Extreme care was necessary during the firing to achieve an even degree of burning throughout the whole load of stone. Too much heat in one place could turn the stone to powder which "killed" it and made it impossible to slake. Too little heat elsewhere left the stone uncalcined. Consequently a number of precautions were taken. First, the opening at the base of the kiln, through which the fire was fed and the burnt lime was later drawn off, was situated on the side opposite the prevailing wind, and often was further sheltered with a sunken approach. When the fire was started this opening was controlled by a door or by masonry blocking which regulated the air supply to the fire. Second, a wind baffle was erected around the top of the kiln. In some kilns this was a fixed wall; in others the baffle was a moveable wooden screen (Fig. 3, b). Third, on top of the kiln itself the limestone was covered with large flat stones roughly set in clay, leaving a few holes for smoke to escape. The most complete description of the firing of a flare kiln is given in de Charleville.
Other authors described similar processes but there is some disagreement as to the length of time necessary for firing. Diderot stated that the normal firing time was 12 hours which seems rather short but still within the 12-to 48-hour range of de Charleville.12 On the other hand it is difficult to equate Diderot's figures with those of de Ramecourt, who suggested that a firing lasted four to six days.13
There were also some differences of opinion concerning the best type of wood fuel for flare kilns. De Charleville went into the subject most thoroughly and came to the conclusion that the best woods were pine, aspen, willow and fir because they burnt with a lot of flame and little smoke.14 Green wood could be used if it had been heated and dried before being placed in the kiln. De Charleville recommended that the fire be started with fascines of brush-wood and reeds, then brought to a higher temperature with white woods, followed by oak and a resinous wood to keep the fire at maximum heat.15 However, Diderot stated that fascines of brushwood were sufficient for the whole firing, and many of the kilns described by the Ramecourt used this fuel exclusively.16 For those kilns using other woods, de Ramecourt recommended poplar since it flamed very easily.17 Per Kalm on his travels through Quebec in 1749 noted that cedar was there regarded as one of the best fuels.18 The Masse treatise commented that the kilns shown in the illustrations were normally fired with brushwood or pine fagots, but that the king's kilns were fired with coal.19 It is not certain, however, whether he was referring to flare or running kilns. De Ramecourt and de Charleville recommended coal only for the latter.20 In Alsace there was an unusual type of flare kiln that was square with a low central partition and two arched entrances (Fig. 4). The partition served principally as a ledge for the jambs of the two tunnel-like arches of limestone that ran through to the back wall. The tunnel shape and the use of two arches resulted in an easier and quicker circulation of heat through the mass of stones.21 A modification of this type of kiln was used to fire bricks and tiles at the same time as calcining limestone. However, the method was not economical in France, and contraction of the limestone caused disturbance and distortion of the bricks and tiles lying on top. Running Kilns It appears from the statements of contemporary writers that by the mid-18th century, running kilns were as common as flare kilns for supplying large amounts of lime. The most common interior shape was an inverted cone or pyramid. The latter shape was used when the kiln was fired with wooden logs and was necessary to allow the large pieces to entirely cover the inside of the kiln. Inverted cone-shaped kilns were usually fired with coal, partly because it was cheaper, and partly because the smoke from burning vegetal matter, including wood, was believed to block the pores of the limestone and make calcination difficult. De Ramecourt believed that the best type of running kiln was found in Flanders. His description of it was copied verbatim into the supplement of Diderot's Encyclopédie, together with a reproduction of the illustrations (Fig. 5), which show a double-walled circular kiln approximately 11 pieds high with a shallow loading ramp built at a tangent. The interior of the kiln was an inverted cone, 7 pieds in diameter at the top, decreasing to 20-28 pouces at the cendrier or ash-box which was 15-17 pouces deep (Fig. 5, 4, G). Around the base of the kiln there were three draw-holes, 12-13 pouces wide, closed by metal doors that opened into the cendrier (Fig. 5, 5, F). Access to these was gained by means of short covered passageways which ran through the body of the kiln (Fig. 5, 2, D). In those kilns that were built into the side of a hill, access to these passageways would necessitate excavating long sunken pathways into the hillside. To avoid this expensive task such kilns were frequently built with a circular covered corridor around the kiln wall giving access to all the drawholes (Fig. 5, 8, 9). The drawhole arches were supported by iron bands since they were subject to damage when the lime was being drawn off (Fig. 5, 7, i). At springer level each of the drawholes had an iron bar running across the opening and anchored in the masonry jambs (Fig. 5, 7, e). Other iron bars were laid across these iron bars spanning the cendrier to form a grille on top of which the fuel and limestone were placed (Fig. 5, 5, E). To load this type of kiln the limeburner
To fire this kiln the following method was used.
The fire was then left to burn its way up through the lime. When all the fuel at the bottom of the load was consumed, the limeburner opened each of the drawholes in turn and removed the bars of the grille. The burnt lime then immediately fell into the cendrier where it was shoveled into barrows and carted away, while the load above settled further into the kiln. Once the bars had been removed at the base, drawing off the lime became an almost continuous process that was carried out equally from all three drawholes to minimize uneven slumping of the load. As the process continued, the drawholes gradually became blocked with ashes. When this happened, the bars were forced back into position and the ashes cleared out. These ashes could then be sold for mixing into mortar that was to be used in damp places.24 At the same time as the lime was being drawn off at the base of the kiln, more stone and fuel were being added at the top in the void created by the slumping and settling of the mass within the kiln. It was from the continuous nature of the firing and loading process that these kilns were known as fours coulants or running kilns.25 De Ramecourt stated that he had seen kilns similar to those from Flanders in the Rhône valley (Fig. 6, a). They were more simply made from local fieldstone, usually sandstone, and mortar was used as a bonding agent, but the over-all shape was similar with the exception of a short pillar occupying what would have been the cendrier. This pillar served two purposes: first, it supported the wooden planks that carried the load of fuel and limestone in a manner similar to the iron bars in the Flanders kilns; second, it channeled the burnt stone to the three drawholes by dispersing the mass of stone as it descended through the kiln.26 Other types of running kilns were used for different fuels. It seems that hard limestones were often burnt with charcoal in special cylindrical kilns, though de Ramecourt could see no reason why ordinary kilns could not be used.27 However, many limeburners did not like charcoal as a fuel since it was supposed to make the lime "bitter" and difficult to mix with sand. These kilns were approximately 10 pieds in over-all diameter, but only 4.5 pieds wide inside, and up to 18 pieds high (Fig. 6, b). There was a single opening at the base with a short flue running to the centre of the kiln. In Picardy a very simple type of kiln was used for burning soft limestones. These inverted pyramid kilns were 5 pieds wide at the top and 6 pieds high. They were cut into the earth and lined with brick, leaving a single opening at the base. Peat was the normal fuel for these kilns.28 No illustration is given of this type of kiln, but it sounds very similar to the simple lime-kiln structure number 47 found at Jamestown, Virginia in a late 17th-century context.29 Finally there was a type of kiln that was neither flare nor running yet had characteristics of both. This kiln, commonly used by individuals for a single load of lime, was a circular structure 18 pieds in diameter. It consisted of a shallow depression with a stone-lined channel running to the centre from a small pit on the perimeter (Fig. 6, c). Baskets of medium-sized stones were thrown into this hollow forming a flat layer. On top of this a thin layer of powdered coal was laid leaving a gap around the edges. On top of the powdered coals alternating layers of coal and stone were laid up to a height of 14 pieds. The whole cone-shaped mass was then plastered over with clay and the lower parts were reinforced with stone.30 This kiln can hardly be described as a flare kiln since the fuel and limestone were arranged as for a running kiln. But, since the kiln had to be demolished to be emptied, it does not qualify as a running kiln either. As with the simple flare kiln described by Diderot, this one was cheap to build but the cost of lime from it was high. Slaking After lime had been burnt to form quicklime, it had to be slaked to form a hydrated lime suitable for mixing with other materials to make mortar. Slaking involved adding water to the lime, which absorbed it as water of crystallization, giving off heat up to 300°C. and causing rapid expansion. During slaking, especially with hydraulic limes, the silica and aluminum impurities combined with the lime to form cementitious compounds that were insoluble in water. This resulted in a mortar capable of setting under water. A non-hydraulic lime could be converted to an hydraulic lime by the addition of various materials (e.g., pozzolana, crushed tile, burnt shale). Slaking had to be carried out as soon as possible after burning since the quicklime was liable to absorb moisture from the atmosphere and start spontaneous air-slaking, which reduced the quicklime to a pulpy powder that would not properly expand when fully slaked. There were two methods of slaking described in numerous 18th-century treatises on building. One which most authors accredited to Philibert de Lorme, but which probably was a very ancient method of slaking, was designed to produce large quantities of high quality lime that could be stored and used over a long period of time. The other was better suited for producing lime to be used immediately. Although Diderot claimed that de Lorme's method was an old-fashioned one, it was still described in 1777 by J. F. Blondel as the best method of slaking lime.
A slightly different description of de Lorme's method in Diderot advised a wait of two or three years before using the lime.32 One treatise written in 1743 stated that lime made this way would keep for 20 years.33 Another treatise written in 1728 recommended lime slaked by this method for lining walls and backing frescoes, since it did not absorb the paint.34 The second method of slaking was more efficient since it enabled the mason to eliminate unburnt lumps of limestone from the mass of lime in the initial slaking process (Fig. 7). Again, Blondel gave the most complete 18th-century account of this process.
Briseux wrote that after the lime had been poured into the larger basin it was watered for four or five days until no more cracks appeared and the lime became one homogeneous mass, after which it was covered with sand.36 There are two articles by different authors in the Encyclopédie dealing with slaking that describe a similar procedure to that of Blondel except that one of them, in contradiction to the other, states that too much water will not hurt the lime, and cautions only against using too little water.37 Diderot regarded the main advantage of this method to be its ability to provide lime for immediate use, and, therefore, made no mention of covering the lime in the larger pit with sand. De Charleville, writing in 1828, made no mention of de Lorme's method, but did describe in detail a method similar in principle to the second one described by Blondel.38 It differed in the use of a wooden tank instead of the smaller pit, although he did note elsewhere that a pit may sometimes be used. De Charleville agreed with Blondel, against Diderot, that a very precise amount of water should be used, but he also concurred with Diderot against Blondel, that the purpose of this method was to provide lime to be used almost immediately. One method of slaking for high-quality lime was to make a depression in the centre of a mound of sand into which was placed some quicklime. The quicklime was watered and covered with a layer of sand for seven or eight hours until the slaking was completed.39 By this method the lime turned to a fine powder rather than the pulpy mass resulting from the other methods. Other methods of slaking that came into use in the 19th century—immersion, complex and spontaneous slaking—were mentioned by de Charleville and other later authors.40 De Lorme's method was not mentioned in any of the available 19th-century sources. Instead the emphasis was on the method described by Blondel. The reason for this is clear: de Lorme's method was not susceptible to mass production in any age when the scale and speed of production were becoming ever greater. His method involved a long wait between slaking and use. By contrast, Blondel's method, especially as seen by de Charleville, was ideally suited to continuous production. There is, therefore, the same movement from intermittent to continuous production in slaking as occurred in the burning of lime. |
||||||||||||||


|
||||||||